
在三台centos7主机上搭建mysql8集群
理清名词、概念
innodb、ndb、InnoDB Cluster集群、MySQL Cluster集群 都是些什么、有什么区别,参考:
https://www.cnblogs.com/margiex/p/12706567.html
环境
三台centos7主机已安装mysql8单机,且root用户密码都一样
安装文档见 https://www.cnblogs.com/tangshow/p/15931001.html
或https://www.tang.show/mysql/linux-centos7-yum%e5%ae%89%e8%a3%85mysql8%e5%8d%95%e6%9c%ba/
或自动安装脚本https://www.tang.show/mysql/centos7%e5%ae%89%e8%a3%85mysql8%e6%9c%80%e6%96%b0%e7%89%88%e8%84%9a%e6%9c%ac/

其中用户权限要执行 grant all privileges on *.* to 'root'@'%' with grant option;
安装
三台主机都设置hostname、hosts解析
hostnamectl set-hostname vm00x

cat >>/etc/hosts<<EOF
192.168.2.131 vm001
192.168.2.132 vm002
192.168.2.134 vm003
EOF
三台主机都安装mysql-shell
#mysql-shell官方下载 https://dev.mysql.com/downloads/shell/
yum install wget -y && wget https://dev.mysql.com/get/Downloads/MySQL-Shell/mysql-shell-8.0.32-1.el7.x86_64.rpm && rpm -ivh mysql-shell-8.0.32-1.el7.x86_64.rpm
三台主机都修改配置文件指定每个mysql id,三台机不能重复,例:
echo server_id=xx >> /etc/my.cnf 三台主机都重启mysql
systemctl restart mysqld
三台主机都初始化配置
mysqlsh
shell.connect('root@localhost:3306');
#登录
    输出:
    MySQL  JS > shell.connect('root@vm001:3306');
    Creating a session to 'root@vm001:3306'
    Please provide the password for 'root@vm001:3306': 输入密码
    Save password for 'root@vm001:3306'? [Y]es/[N]o/Ne[v]er (default No): 直接回车
    Fetching schema names for auto-completion... Press ^C to stop.
    Your MySQL connection id is 11
    Server version: 8.0.32 MySQL Community Server - GPL
    No default schema selected; type \use <schema> to set one.

dba.configureLocalInstance();
#当向集群加入成员时,必须先检查该成员是否能够满足InnoDB Cluster的要求

    输出:
    <ClassicSession:root@vm001:3306>
     MySQL  vm001:3306 ssl  JS > dba.configureLocalInstance();
    Configuring local MySQL instance listening at port 3306 for use in an InnoDB cluster...
    This instance reports its own address as vm001:3306
    Clients and other cluster members will communicate with it through this address by default. If this is not correct, the report_host MySQL system variable should be changed.
    applierWorkerThreads will be set to the default value of 4.
    NOTE: Some configuration options need to be fixed:
    +----------------------------------------+---------------+----------------+--------------------------------------------------+
    | Variable                               | Current Value | Required Value | Note                                             |
    +----------------------------------------+---------------+----------------+--------------------------------------------------+
    | binlog_transaction_dependency_tracking | COMMIT_ORDER  | WRITESET       | Update the server variable                       |
    | enforce_gtid_consistency               | OFF           | ON             | Update read-only variable and restart the server |
    | gtid_mode                              | OFF           | ON             | Update read-only variable and restart the server |
    +----------------------------------------+---------------+----------------+--------------------------------------------------+
    Some variables need to be changed, but cannot be done dynamically on the server.
    Do you want to perform the required configuration changes? [y/n]: 输入y
    Do you want to restart the instance after configuring it? [y/n]: 输入y
    Configuring instance...
    The instance 'vm001:3306' was configured to be used in an InnoDB cluster.
    Restarting MySQL...
    NOTE: MySQL server at vm001:3306 was restarted.
主节点执行(vm001)
mysqlsh

var cluster = dba.createCluster('my1');
# 创建一个 cluster,命名为 'my1'

    输出:
    MySQL  vm001:3306 ssl  JS > var cluster = dba.createCluster('my1');
    A new InnoDB Cluster will be created on instance 'vm001:3306'.
    Validating instance configuration at vm001:3306...
    This instance reports its own address as vm001:3306
    Instance configuration is suitable.
    NOTE: Group Replication will communicate with other members using 'vm001:3306'. Use the localAddress option to override.
    Creating InnoDB Cluster 'my1' on 'vm001:3306'...
    Adding Seed Instance...
    Cluster successfully created. Use Cluster.addInstance() to add MySQL instances.
    At least 3 instances are needed for the cluster to be able to withstand up to
    one server failure.

cluster.status();
# 创建成功后,查看cluster状态,vm001已自动加入集群,成为主节点

    输出:
    MySQL  vm001:3306 ssl  JS > cluster.status();
    {
        "clusterName": "my1",
        "defaultReplicaSet": {
            "name": "default",
            "primary": "vm001:3306",
            "ssl": "REQUIRED",
            "status": "OK_NO_TOLERANCE",
            "statusText": "Cluster is NOT tolerant to any failures.",
            "topology": {
                "vm001:3306": {
                    "address": "vm001:3306",
                    "memberRole": "PRIMARY",
                    "mode": "R/W",
                    "readReplicas": {},
                    "replicationLag": "applier_queue_applied",
                    "role": "HA",
                    "status": "ONLINE",
                    "version": "8.0.32"
                }
            },
            "topologyMode": "Single-Primary"
        },
        "groupInformationSourceMember": "vm001:3306"
    }

#添加实例
cluster.addInstance('root@vm002:3306');
cluster.addInstance('root@vm003:3306');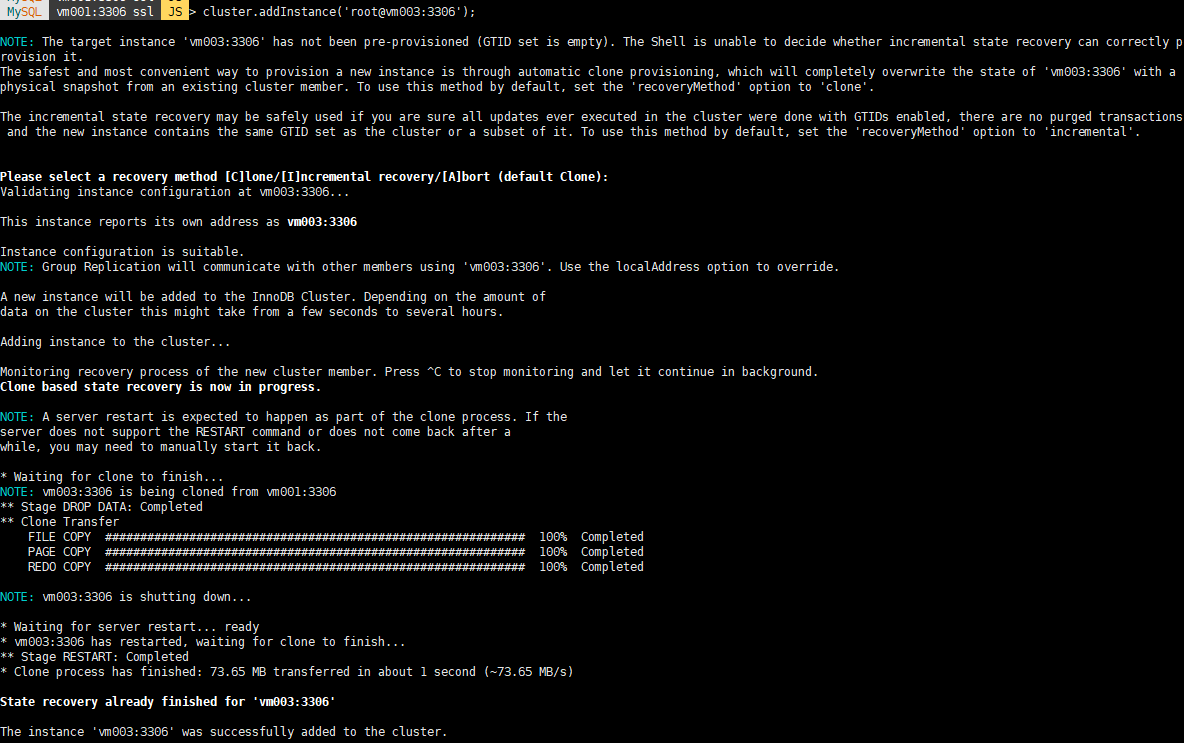
# 创建成功后,查看cluster状态,所有节点已加入
cluster.status();
或dba.getCluster().status()
    输出·:
    {
    "clusterName": "my1",
    "defaultReplicaSet": {
    "name": "default",
    "primary": "vm001:3306",
    "ssl": "REQUIRED",
    "status": "OK",
    "statusText": "Cluster is ONLINE and can tolerate up to ONE failure.",
    "topology": {
        "vm001:3306": {
            "address": "vm001:3306",
            "memberRole": "PRIMARY",
            "mode": "R/W",
            "readReplicas": {},
            "replicationLag": "applier_queue_applied",
            "role": "HA",
            "status": "ONLINE",
            "version": "8.0.32"
        },
        "vm002:3306": {
            "address": "vm002:3306",
            "memberRole": "SECONDARY",
            "mode": "R/O",
            "readReplicas": {},
            "replicationLag": "applier_queue_applied",
            "role": "HA",
            "status": "ONLINE",
            "version": "8.0.32"
        },
        "vm003:3306": {
            "address": "vm003:3306",
            "memberRole": "SECONDARY",
            "mode": "R/O",
            "readReplicas": {},
            "replicationLag": "applier_queue_applied",
            "role": "HA",
            "status": "ONLINE",
            "version": "8.0.32"
        }
       },
       "topologyMode": "Single-Primary"
       },
       "groupInformationSourceMember": "vm001:3306"
    }

至此安装结束
测试
主节点创建库和表
 create database t1
在其他节点查看同步结果
 show databases;
其他参考
https://blog.csdn.net/qq_33158376/article/details/109799989
https://www.bbsmax.com/A/q4zVY0xWdK/